This is a project done while I was relegated to the couch during my recent extended flare up of fibromyalgia and pain.
One of the things that I dreaded about flare ups was that my ability and energy for creating would drastically drop or disappear altogether. I wanted and needed a way to work around that when it happened.
I decided to organize a few supplies that I could easily access, keep near me on the couch, and use on my roughest days. I repurposed several large styrofoam meat trays - the kind you get when you buy a family pack of meat.
They work perfectly, with enough room for a few supplies, and they stack and store well in my craft closet.
The project that you see in the photos here (except for the frames) was made using the supplies on one tray. On that tray, I stored pages from a vintage book and hymnal; homemade alcohol ink sprays, brads, several colors of acrylic paint, tissue paper and thin wire.
Using the book pages, I cut each shape out by hand and then colored them with the sprays (except for the tissue paper). I followed up with assembling each flower and butterfly individually. Each day, I stored whatever I had made in small ziploc bags; partly for organization and partly to keep them out of easy reach of my grandson, lol.
For this project, I painted the backgrounds in acrylic and then layered over that with tissue paper. I used the same tissue paper in both pictures. I arranged flowers and butterflies on the background and, once I was happy with the composition, I attached them to the background. I finished up by stamping a relevant quote or saying on each one.
I have these hanging on the wall above my desk, next to the bulletin board that I posted earlier. I smile every time I look at them!
Shared for Whatever You Want Wednesday at Free Pretty Things For You
Shared for Show and Tell Saturday at Be Different Act Normal
Show Off Your Stuff Party at Fireflies and Jellybeans
Thursday, May 10, 2012
Monday, April 16, 2012
Thank You Brené Brown
BrenĂ© recently had a post titled ‘The Worst Advice EVER’ that really hit home for me. In her post, she writes about her take on a little piece of advice that I’m sure all of us have heard at some point – ‘You can rest when you’re done!’ You can read her post here The Worst Advice Ever
Living with chronic illness and disabilities is an ongoing, daily and often, a moment-by-moment process of redefining my way of being in the world. I’ve often been given advice along the lines of ‘You just have to try harder’; ‘You need to make more of an effort’ or the related ‘You’re not trying hard enough’ and ‘you can be sick when you’re done’. Then there’s that two edged sword that some people try to bring into play, comparing my situation with someone elses. ‘So-and-so has chronic illness too, but it doesn’t seem to stop her. She never uses it as an excuse!’
Do I need to mention the guilt I used to feel (and I admit I sometimes still do) at hearing those? Yes, I think I do. They are comments given by well-meaning friends, family and acquaintances. People who really have no concept or understanding of what it is to be me; to live my life on a daily basis; or even to simply live with chronic illness and chronic pain. Words that are meant lovingly and offered as a gift instead become judgment. And those judgments have the power to create heartache, self-doubt and blame, hardship and yes, physical pain!
I ask you to keep in mind that, if I share something of what I’m experiencing, I am not making excuses. I am not asking for or expecting your sympathy, your pity. I am simply expressing a part of my reality. I ask you also to remember that what I (or any of us!) experience each day, and how I experience it, is going to be different from everyone else – even those who share the same exact illness and disabilities. Our coping mechanisms, our various boundaries, our tolerance levels, our experiences will ALL be different and defined by our individuality.
I can only speak from my own experience; I can only validate myself. ‘You can rest when you’re done’ has a totally different meaning within the context of my life. For me, resting when I’m done means learning to honor myself by listening to my body’s cues. It means finding my own stopping and starting points in everything that I do. It means learning to live in the moment and also learning to be gentle with myself.
If you like the artwork that I'm showing here, I've made it available for you to print! Just go to Be Gentle With Yourself then right click and choose 'print'. Let me know if you print it...this is the first time I've made something available for printing and I'd love to know!
Thursday, April 12, 2012
Artist Trading Card Experiment
My daughter and I both participated in our first ATC swap last month, also making our very first ATC's. It was a nice way to have Marta be involved, and with only three of us trading, it was a small enough project that I was able to complete it even while in the midst of a fibromyalgia flare up. And small enough for Marta to be able to fit it into her busy schedule. Working full-time, taking college courses and parenting a three year old don't leave a lot of time for other pursuits (can you tell I'm a proud Mama?).
This is one of a series of cards my friend Terri made with "Home is Where the Heart Is" as the theme.
The background was done using tissue paper and irridescent strips of paper. The birds and hearts were cut by hand from scrapbooking paper and the legs were hand drawn, then 'adore' and 'happiness' stickers were applied before finishing up with a coat of gel medium.
Marta's second and third cards (not shown here) were done by coloring the background using liquid chalks, then applying black and white floral cutouts. The cutouts were colored with artist markers and then the cards were finished using rubber stamps.
I didn't follow a theme for my cards, but this is the first one:
The background was first sprayed with homemade alcohol ink spray and then lightly coated with liquid chalk. I used an East Indian motif from Dover and applied the image as a transfer (my first attempt at doing a transfer!), which I then colored with artist markers and outlined in black. The words are handwritten.
I'm happy with ALL of the results and very much enjoyed doing the ATC swap. We're going to be doing another one for April, with the addition of one more person. We're open to having more people participate, but the deadline is April 30th!
If you'd like to give and receive little pieces of art from the heart, let me know. Group swaps will be between five to seven people, no matter how many participants there are! Just leave a comment here with your contact info (your email address should be in this format to discourage spam, etc: CreativeArtitude at hotmail dot com)
This is one of a series of cards my friend Terri made with "Home is Where the Heart Is" as the theme.
She started by lightly sanding and then applying acrylic paint as the foundation, followed by inking the background using gauze to daub on two different colors of Ranger paints. She used paper from Heidi Grace that depicted a series of whimsical houses, cutting each house by hand. To give each card a 3D effect, Terri added and outlined trees and painted the sun, following up by hand sewing beads and sequins to the background.
I love the detail, layers and colors on these ATC's!
If you line up all three cards, it looks like an actual street of houses - as Terri says 'like we are neighbors, because I think of us as not only friends but as neighbors'.
As special as the cards are, that sentence is even more so!
This next card was done by Marta.
Marta's second and third cards (not shown here) were done by coloring the background using liquid chalks, then applying black and white floral cutouts. The cutouts were colored with artist markers and then the cards were finished using rubber stamps.
I didn't follow a theme for my cards, but this is the first one:
The background was first sprayed with homemade alcohol ink spray and then lightly coated with liquid chalk. I used an East Indian motif from Dover and applied the image as a transfer (my first attempt at doing a transfer!), which I then colored with artist markers and outlined in black. The words are handwritten.
I'm happy with ALL of the results and very much enjoyed doing the ATC swap. We're going to be doing another one for April, with the addition of one more person. We're open to having more people participate, but the deadline is April 30th!
If you'd like to give and receive little pieces of art from the heart, let me know. Group swaps will be between five to seven people, no matter how many participants there are! Just leave a comment here with your contact info (your email address should be in this format to discourage spam, etc: CreativeArtitude at hotmail dot com)
Tuesday, March 20, 2012
Angels, Angels Everywhere!
Do you believe in Angels? I certainly do, and they've been appearing in my life and in my dreams more and more often since the beginning of the year. When I heard about a new, upcoming course called Angels In My Studio, it just seemed to be perfectly synchronous with that.
Angels In My Studio is a five month long course that will allow you to connect more deeply with your angels, both in your everyday life AND in your creativity, while learning techniques to help you incorporate angelic energy and forms into your creations. It's learning techniques, and so much more.
The list of instructors is amazing too! Sheri Ann Ponzi, Chris Zydel, Susan Risse, Tracy Verdugo, Whitney Ferre, Anna Schuler, Claudia Olivos, KaePea, Kylie Pepyat-Fowler and Lori Franklin - all incredibly creative, talented women!
You can go to Angels In My Studio to find more information. There are even a couple of introductory videos there. I think you'll be intriqued and hope that you'll be joining us!
Yes, I'm going to be there, and I'm so excited that I'll be able to be a part of it! Hooray!! I was notified on 3/18 (which happened to be my 55th birthday!) that I'd won a spot in the course via a giveaway on Susan Risse's blog. What a beautiful, perfect, happy dance gift!!
There's good news for you too! Sheri is having a giveaway for people who publish blog posts about Angels In My Studio. Because I've already won a spot, Sheri has given me permission (if my blog post is chosen) to give two of you a chance to win a place in the course!
All you have to do is to leave a comment on this post by March 31st, telling me why you're excited about the course - and let your angels know that you want to be there! Be sure to leave your contact information as well.
If you post a link to this blog post on Facebook, mentioning Angels In My Studio, leave a separate comment letting me know and I'll enter your name twice! If my blog post wins the giveaway, then I'll pull two names from those of you who've commented.
Angels In My Studio is a five month long course that will allow you to connect more deeply with your angels, both in your everyday life AND in your creativity, while learning techniques to help you incorporate angelic energy and forms into your creations. It's learning techniques, and so much more.
The list of instructors is amazing too! Sheri Ann Ponzi, Chris Zydel, Susan Risse, Tracy Verdugo, Whitney Ferre, Anna Schuler, Claudia Olivos, KaePea, Kylie Pepyat-Fowler and Lori Franklin - all incredibly creative, talented women!
You can go to Angels In My Studio to find more information. There are even a couple of introductory videos there. I think you'll be intriqued and hope that you'll be joining us!
Yes, I'm going to be there, and I'm so excited that I'll be able to be a part of it! Hooray!! I was notified on 3/18 (which happened to be my 55th birthday!) that I'd won a spot in the course via a giveaway on Susan Risse's blog. What a beautiful, perfect, happy dance gift!!
There's good news for you too! Sheri is having a giveaway for people who publish blog posts about Angels In My Studio. Because I've already won a spot, Sheri has given me permission (if my blog post is chosen) to give two of you a chance to win a place in the course!
All you have to do is to leave a comment on this post by March 31st, telling me why you're excited about the course - and let your angels know that you want to be there! Be sure to leave your contact information as well.
If you post a link to this blog post on Facebook, mentioning Angels In My Studio, leave a separate comment letting me know and I'll enter your name twice! If my blog post wins the giveaway, then I'll pull two names from those of you who've commented.
Angels are all around us, all the time, in the very air we breathe.
~Quoted in The Angels' Little Instruction Book by Eileen Elias Freeman, 1994
Tuesday, March 13, 2012
Antique/Ethnic Inspiration Board
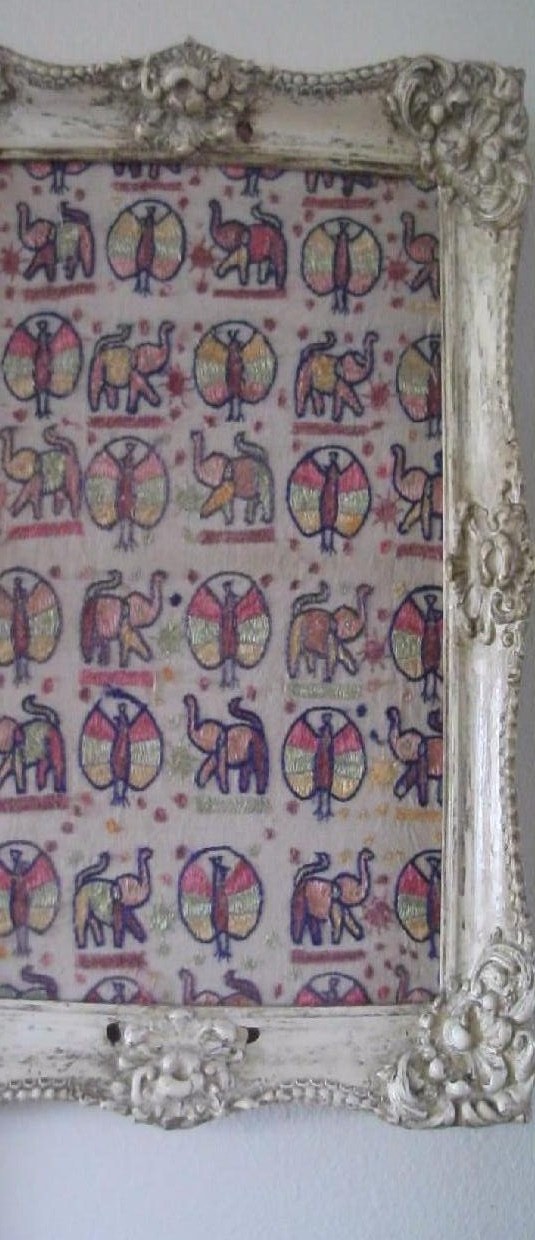
After my Grandad passed, I was helping my mom clean out his storage shed. I found two beautiful, antique picture frames. I didn't have a clue what I would do with them; I just knew that I wanted them.
I also had a wall tapestry, hand embroidered and purchased in India and given to me by my ex inlaws, 30 years ago, when they first came to the U.S. as refugees from Afghanistan.
I hadn't displayed the tapestry in years. Not because I didn't like it, but perhaps because there were so many painful memories associated with it. I never contemplated getting rid of it, yet it just sat among other things in my cedar chest; neatly tucked away and seldom looked at.
When I decided that I needed an inspiration/bulletin board, it just seemed natural to combine the two. Who would have known? One of the antique frames with a portion of the tapestry. Antique married to ethnic, and I've always loved the bright colors and motifs in ethnic handcrafts. A blending of generations and culture, even sorrow and joy.
The project itself became a way and a space for healing both the loss of my grandparents and some of the pain I still held from my marriage. It gave me, first of all, an awareness that those parts existed deep within me as wounds still waiting to be healed. And, it gave me a way to honor both the pain and the healing.
This is the finished project and it now holds a central space above my desk, next to an altered art vintage window frame. I wasn't able to capture the vibrancy of the colors, but here it is:
Putting my inspiration board together was fairly simple. I measured the back opening of the frame, then added two inches to each side and cut the tapestry to measure. I cut a large piece of foam core board to fit the back of the frame.
With the fabric laying face down, I centered the foam core board on it. Using a hot glue gun, I attached each edge separately, taking time to miter each corner and checking the tautness of the fabric before proceeding to the next side.
To insert the fabric panel into the frame I simply turned the frame over. Using the glue gun, I attached one edge of the panel at a time, face down, being careful to keep the panel centered.
The results, I think, are beautiful. I'm totally happy with my new inspiration board and love having it hanging above my desk!
I may use the rest of the tapestry fabric to make a cushion and covered armrests for my desk chair. Maybe a protective mat for the top of my scanner. Or maybe you have an idea or inspiration for me?
I also had a wall tapestry, hand embroidered and purchased in India and given to me by my ex inlaws, 30 years ago, when they first came to the U.S. as refugees from Afghanistan.
I hadn't displayed the tapestry in years. Not because I didn't like it, but perhaps because there were so many painful memories associated with it. I never contemplated getting rid of it, yet it just sat among other things in my cedar chest; neatly tucked away and seldom looked at.
When I decided that I needed an inspiration/bulletin board, it just seemed natural to combine the two. Who would have known? One of the antique frames with a portion of the tapestry. Antique married to ethnic, and I've always loved the bright colors and motifs in ethnic handcrafts. A blending of generations and culture, even sorrow and joy.
The project itself became a way and a space for healing both the loss of my grandparents and some of the pain I still held from my marriage. It gave me, first of all, an awareness that those parts existed deep within me as wounds still waiting to be healed. And, it gave me a way to honor both the pain and the healing.
This is the finished project and it now holds a central space above my desk, next to an altered art vintage window frame. I wasn't able to capture the vibrancy of the colors, but here it is:
Putting my inspiration board together was fairly simple. I measured the back opening of the frame, then added two inches to each side and cut the tapestry to measure. I cut a large piece of foam core board to fit the back of the frame.
With the fabric laying face down, I centered the foam core board on it. Using a hot glue gun, I attached each edge separately, taking time to miter each corner and checking the tautness of the fabric before proceeding to the next side.
To insert the fabric panel into the frame I simply turned the frame over. Using the glue gun, I attached one edge of the panel at a time, face down, being careful to keep the panel centered.
The results, I think, are beautiful. I'm totally happy with my new inspiration board and love having it hanging above my desk!
I may use the rest of the tapestry fabric to make a cushion and covered armrests for my desk chair. Maybe a protective mat for the top of my scanner. Or maybe you have an idea or inspiration for me?
Friday, March 9, 2012
Mixed Media Paint Chip Canvas
I haven't created very much art lately. I've been in the biggest, longest flare up of my fibromyalgia in more than five years and it's pretty much brought some things - like making art - to a standstill.
Creativity is so much a part of me though, that I've found ways to nurture it. The things that I've worked on have involved small projects that I can do while reclining; things that are easy to step away from when needed. Some embellishments made from the pages of vintage books and hymnals. My first attempt at ATC's. A bit of beading.
In lieu of having more current art to share, I'd love to show you the mixed media canvas that I created for my daughter during the holidays. The original idea was found here.
I started by coating a square canvas with gesso, then layering vintage ephemera over that. To give it a more aged appearance, I used a wash of acrylic paint and water.
I measured the canvas and cut paint chips to fit. I wanted to create a tile-like effect, so I allowed for space between each chip and laid them out until I had an arrangement that I liked. Before securing the chips to the canvas with gel medium, I lightly stained their edges with fluid chalk in a medium brown to give an illusion of depth. I followed up with a second wash of acrylic and water.
Creativity is so much a part of me though, that I've found ways to nurture it. The things that I've worked on have involved small projects that I can do while reclining; things that are easy to step away from when needed. Some embellishments made from the pages of vintage books and hymnals. My first attempt at ATC's. A bit of beading.
In lieu of having more current art to share, I'd love to show you the mixed media canvas that I created for my daughter during the holidays. The original idea was found here.
I started by coating a square canvas with gesso, then layering vintage ephemera over that. To give it a more aged appearance, I used a wash of acrylic paint and water.
I measured the canvas and cut paint chips to fit. I wanted to create a tile-like effect, so I allowed for space between each chip and laid them out until I had an arrangement that I liked. Before securing the chips to the canvas with gel medium, I lightly stained their edges with fluid chalk in a medium brown to give an illusion of depth. I followed up with a second wash of acrylic and water.
I wanted to paint cherry blossoms onto the 'tiles'. My drawing skills aren't very strong, so I first drew the blossoms out on paper, then used the drawing as a guide for painting on the canvas, using the new markers that were a holiday gift from my kids.
I then added a 3D dragonfly embellishment to the lower right portion of the canvas and finished off with several layers of high gloss to give the look of shiny tile.
I was really happy with the results. The paint chips really do look like tile! I'm hoping to make a second canvas to go with the first so that my daughter has a matched set above her sofa.
Has anyone else found ways to use paint chips in their art or their craft projects? If you have, I'd love for you to share!
Monday, January 30, 2012
Valentine's Day Cards
Beautiful cards and Valentine's Day just seem to go hand in hand, so I decided to experiment in making some of my own cards. I don't think I've made a card since 6th grade, lol!
Since I've been dealing with several fibro flares and a whole lot of fibro fog and exhaustion, the cards turned out to be the perfect project. One that I could pick up and put down how ever often was needed and allowed me to work in small increments.
I decided to use paper piecing in designing my cards. I began by experimenting with drawings and templates and the templates were the most frustrating part of the process! I found myself wondering if I was wasting my time; doubting whether the templates would work. Do you ever experience a certain level of doubt when trying something new?
My daughter stopped by to visit about the time that the templates were completed, and she sat down with the templates and a selection of scrapbooking papers and glue. I absolutely loved the results - which you can see here:
I was totally encouraged by her results, so I moved on to actually creating the cards. I used two different designs - a cute little owl and a segmented, layered heart - and these were some of my results:
If you'd like to try your hand at card making, I'm including the templates for you. Left click on the photo and choose 'print' and the template should print up full size. I recommend printing on card stock. If you have trouble printing the template, I can send it to you as an attachment if you provide your email address.
The templates are hand drawn, so there will be slight imperfections. Don't let that worry you! Any imperfections simply add to the charm and originality of your work. The only place where acurracy really counts is in that cut down the center of the hearts.
I recommend cutting out multiples of each piece so that you can play with color combinations. For the heart, each piece (with the exception of the largest heart) is cut in half and the pieces are combined for contrast. The backgrounds are up to you. I used either scrapbooking paper, mulberry paper or glitter paints, but go with your own imagination!
Feel free to reduce or enlarge the templates to use in ATC's, collage, etc. The only thing I ask is that you give credit and/or link back to this post if you publish your work on the internet. It would be wonderful, too, if you share a link to your results here in the comment section. I'd love to see what you do with my templates!
Now, to decide who to send the cards too...
Since I've been dealing with several fibro flares and a whole lot of fibro fog and exhaustion, the cards turned out to be the perfect project. One that I could pick up and put down how ever often was needed and allowed me to work in small increments.
I decided to use paper piecing in designing my cards. I began by experimenting with drawings and templates and the templates were the most frustrating part of the process! I found myself wondering if I was wasting my time; doubting whether the templates would work. Do you ever experience a certain level of doubt when trying something new?
My daughter stopped by to visit about the time that the templates were completed, and she sat down with the templates and a selection of scrapbooking papers and glue. I absolutely loved the results - which you can see here:
I was totally encouraged by her results, so I moved on to actually creating the cards. I used two different designs - a cute little owl and a segmented, layered heart - and these were some of my results:
If you'd like to try your hand at card making, I'm including the templates for you. Left click on the photo and choose 'print' and the template should print up full size. I recommend printing on card stock. If you have trouble printing the template, I can send it to you as an attachment if you provide your email address.
The templates are hand drawn, so there will be slight imperfections. Don't let that worry you! Any imperfections simply add to the charm and originality of your work. The only place where acurracy really counts is in that cut down the center of the hearts.
I recommend cutting out multiples of each piece so that you can play with color combinations. For the heart, each piece (with the exception of the largest heart) is cut in half and the pieces are combined for contrast. The backgrounds are up to you. I used either scrapbooking paper, mulberry paper or glitter paints, but go with your own imagination!
Feel free to reduce or enlarge the templates to use in ATC's, collage, etc. The only thing I ask is that you give credit and/or link back to this post if you publish your work on the internet. It would be wonderful, too, if you share a link to your results here in the comment section. I'd love to see what you do with my templates!
Now, to decide who to send the cards too...
Subscribe to:
Posts (Atom)